
Quick Summary
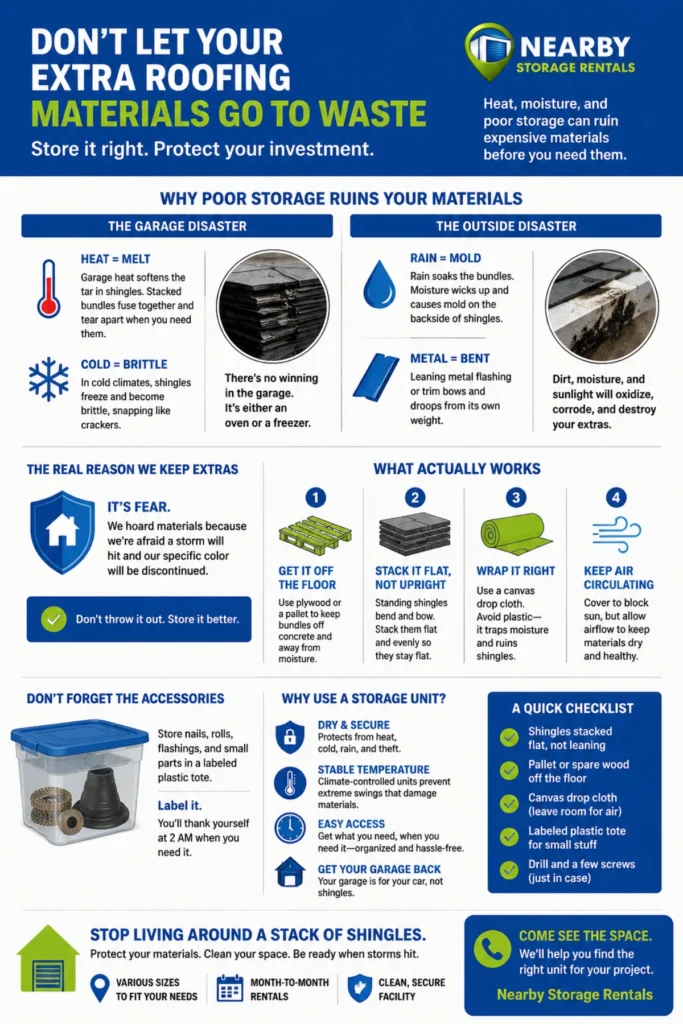
Spare roofing materials can last much longer when you keep them dry, flat, elevated, and protected from extreme temperature swings. Asphalt shingles can soften and stick together in a hot garage, become brittle in freezing conditions, or absorb moisture when stored outside. I recommend placing bundles on a pallet or plywood, covering them with a breathable canvas drop cloth, and keeping nails and accessories in a labeled plastic tote. A clean, secure storage unit, especially climate-controlled storage, can keep everything organized and ready when the next roof repair happens.
Look, I get it.
You just dropped a small fortune on a new roof. Or maybe you finally patched that saggy section over the back porch that you’ve been ignoring since 2019. And now, you are standing there, covered in dust and little asphalt granules that are somehow inside your socks, staring at the leftovers.
There is always leftovers.
The roofing crew left an extra bundle because they “over-ordered just in case.” Or you bought that extra square because you were terrified of running out at 4 PM on a Saturday with the hardware store closing in an hour.
So what do you do with this stuff?
You shove it in the corner of the garage. Obviously.
We all do it. I’ve done it. My neighbor has done it. It’s like a rite of passage for homeowners. You stack it up, throw an old tarp over it, and promise yourself you’ll “deal with it later.”
But here is the thing that nobody tells you. That pile of shingles? It’s not just sitting there quietly. It’s slowly degrading. It’s falling apart. And by the time you actually need it for a repair, it’s going to be completely useless.
Let me explain what actually happens to that stuff when you leave it in the garage.
The Garage is Basically an Oven
Think about your garage in July. You walk in there and it hits you in the face like a wall of hot, stale air. It’s easily 20 degrees hotter in there than outside.
Now, take your asphalt shingles. They are basically oil and glue held together by a fiberglass mat. When that oil gets hot, it softens.
If you have those bundles stacked flat on the concrete, they get heavy. The weight of the top bundle presses down on the bottom bundle. The heat softens the tar, and bam. They fuse together.
When you finally need one of those shingles to replace a blown-off tab, you go to grab it and it comes out looking like a melted candy bar. You try to separate them and they tear. You might as well have burned your money in the driveway.
And if you live in a cold climate, you have the opposite problem. The shingles freeze and get brittle. Then you touch them and they snap like crackers.
There is no winning with the garage. It’s either an oven or a freezer.
The “Storing It Outside” Disaster
Maybe you are smarter than me and you decide to leave the stuff outside. You lean it against the side of the house. At least it has fresh air, right?
Wrong.
Rain gets into the cardboard bundles. It soaks the wrapper. The shingles wick up that moisture from the bottom edge. Pretty soon, you have this black, nasty mold growing on the backside of them.
And the metal stuff? Oh boy.
If you have drip edges, flashing, or those long metal valley panels, and you lean them against the fence, they are gonna bow. I have seen aluminum trim pieces that look like a banana after leaning against a house for a year. The metal simply droops in the middle from its own weight.
Plus, the bottom edge is sitting in the dirt or on wet grass. That edge is going to oxidize and corrode.
The Real Reason We Keep This Junk
Let’s be honest about why we hoard this building material.
It’s fear. Plain and simple.
You are terrified that a storm is going to rip through, tear off a few shingles, and the manufacturer is going to discontinue your specific color blend by the time you try to buy a replacement.
I don’t blame you. Roofing colors change like fashion trends. That “Weathered Wood” you bought three years ago? Yeah, they don’t make that pigment mix anymore. You’ll be stuck with a roof that looks like a patchwork quilt if you don’t keep the extras.
So I am not telling you to throw it out. I am telling you to store it better.
What Actually Works
If you want to keep this stuff alive for the “just in case” moment, you have to treat it like it matters.
Here are the things I learned the hard way after ruining a few bundles myself.
First, get it off the damn floor
Even if you keep it in a shed or a storage unit, you need to put a piece of plywood or a pallet under it. Concrete is porous. It pulls moisture up from the earth. If your bundles are touching the concrete, they are drinking up that dampness. You want an air gap underneath.
Second, never stand them upright
I know it saves floor space. I know you want to tuck them into that tiny sliver between the wall and your workbench. But standing shingles upright is a death sentence. They will bend, bow, and curve. Once a shingle is curved, it will never lay flat on your roof again. It’s going to stick up and catch wind. So lay them flat. Stack them evenly.
Third, wrap them right
A lot of people use plastic tarps. Big mistake. Plastic traps moisture. If there is any humidity in the air, it condenses under that plastic and gets the shingles wet. Use an old cotton drop cloth or a canvas painters tarp. Something that breathes. You want to keep the sun off them, but you want the air to circulate.
What About the Nails and Accessories?
I don’t know about you, but I have about four half-empty boxes of roofing nails rattling around in my tool shed.
Here is a tip. Get a plastic tote. Throw all your nails, your extra rolls of ice and water shield, and those little rubber pipe flashings in there. Label it with a sharpie. “Roof Stuff.”
Because I promise you, when you need a specific 1.25-inch coil nail, you are not going to remember that you put it in the old coffee can behind the lawnmower. Put it in a clear box. Keep it dry.
So, Where Do You Store It?
That is the big question, right?
You don’t want it in the garage because the heat destroys it. You don’t want it outside because the rain ruins it.
This is exactly why I use a storage unit for my building materials.
I know a lot of people think storage units are just for old furniture or boxes of grandma’s china. But honestly, they are the perfect solution for this specific headache.
At Nearby Storage Rentals, we see guys like you coming in with truck beds full of lumber and shingles all the time.
Think about it this way. You can rent a small unit. It’s dry. It’s secure. And if you rent a climate-controlled one, the temperature doesn’t swing wildly. You shove your materials in there, you stack them flat, you put them on a pallet, and you just leave them.
You don’t have to trip over them in the garage. You don’t have to move them when you need to reach the water heater. They just sit there, safe and sound, waiting for that hypothetical storm.
The Convenience Factor You Don’t Think About
Here is another thing.
You know when a storm hits, it never happens at a convenient time. It happens at 2 AM on a Tuesday. The wind is howling, the rain is coming in sideways, and you are standing in the dark with a flashlight trying to find the leak.
Now imagine you kept your spare materials at home in the garage. Good luck digging through that pile in the dark while the rain pours on your head.
When it comes to storing roofing materials, a storage unit makes the process much easier. You just drive over, grab exactly what you need, and get to work. Everything stays organized, protected, and easy to access when time matters most.
I am not saying you need a huge unit. You probably need something the size of a walk-in closet. That is enough to hold a few bundles, a box of flashing, and maybe some rolled roofing.
Don’t Wait Until You Need It
Here is the bottom line.
If you have roofing materials sitting around right now, go check on them. Pull back the tarp. See if they are wet. See if they are stuck together.
If they are ruined, you might as well toss them. Do yourself a favor and get rid of that clutter. It will feel good.
But if they are still in good shape, do not leave them there. Move them out. Get them into a climate-controlled space where they aren’t cooking or freezing.
Your garage is for parking your car. Your car costs way more than those shingles. Don’t let the shingles kick your car out onto the driveway. That is backwards logic.
We have units available in various sizes. We keep them clean. We keep them secure. You can swing by, look at the space, and see if it works for your situation.
We don’t expect you to sign a year-long contract. You can rent month-to-month. Use it for a few months while you finish the project, or keep it long-term for the “just in case” factor.
A Quick Checklist
If you do decide to move your stuff into a unit, here is a checklist of what to bring:
- Shingles stacked flat, not leaning.
- A pallet or spare wood to keep them off the floor.
- A canvas drop cloth to cover them (leave room for air).
- A marked plastic tote for all the small stuff.
- Your drill and a few screws, because you never know when you’ll need them.
That is it. That is all you have to do.
Look, you spent good money on that roof. The materials are expensive. Don’t let them rot away in your garage just because you were too lazy to move them.
If you want to swing by the property and check out our storage units, we’d love to show you around. We can help you pick the right size so you aren’t paying for extra space you don’t need.
Stop living around a stack of shingles. Clean up your space. Protect your investment. And maybe take a trip to the hardware store to buy a new sharpie to label those totes.
You’ll thank me when a branch crashes through your roof next spring.









0 Comments