
Quick Summary
The easiest way to organize Halloween decorations is to throw away broken items, create a clearly labeled “First Night” box with the essentials, and label every storage bin by what is inside. Wrap string lights around cardboard to prevent tangles, bundle extension cords with zip ties, and keep heavy items separate from fragile decorations. If your garage, attic, or basement cannot safely hold everything, a storage unit can keep the bins accessible and protected. You also do not need to finish everything at once. Sorting one box at a time makes Halloween storage much easier to manage.
It’s November 1st.
The candy bowls are empty. Your kids are in a sugar coma. And you are standing in your front yard, staring at a 12-foot inflatable dragon that is now slowly deflating onto your petunias.
You know what you have to do.
You have to take it all down.
And if you are anything like me, this is the part of the holiday you absolutely dread. Putting the stuff up is fun. You’ve got the music playing, you’ve got a pumpkin spice latte in your hand, and the neighbors are waving at you. Taking it down is just… work. It’s cold. It’s dark by 5 PM. And you just want to watch football.
I am a messy person. I will admit that right now. My system for the past five years has been “shove it all in a black trash bag and throw it in the corner of the garage.”
And then, every single October, I hate myself.
I hate myself when I have to dig through three black bags trying to find the one extension cord that actually reaches the roof. I hate myself when I find the spider webs I forgot to throw away that are now permanently stuck to the witch hat.
So, this year, I finally got my act together. And I want to share the sloppy, realistic, non-Pinterest way I figured out how to organize this mess. Because, let’s be honest, we aren’t Martha Stewart. We just don’t want to buy a new box of lights every year because we can’t find the old ones.
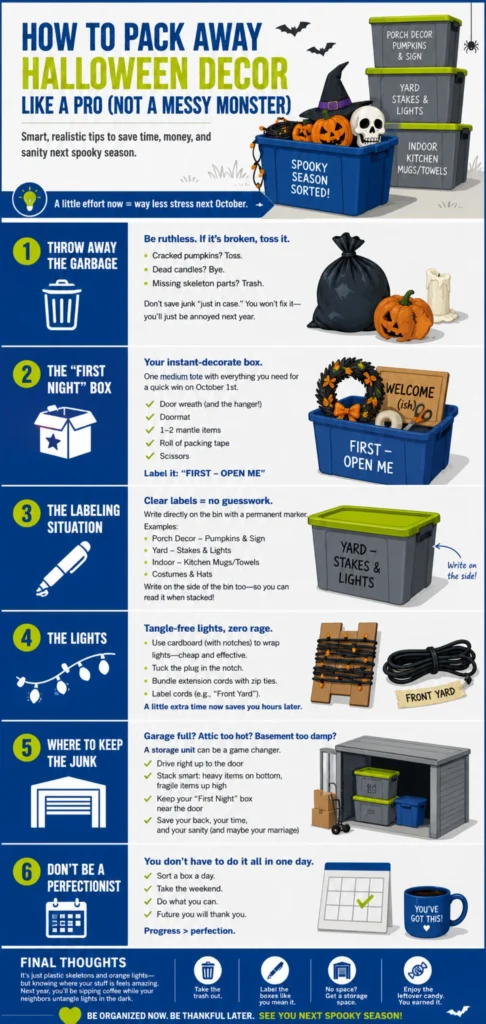
Step 1: Throw away the garbage
I know, this seems obvious. But you have to be ruthless.
That plastic pumpkin that has a crack in it? Toss it.
Those battery-operated candles that don’t turn on anymore? Bye.
That one random arm that fell off the skeleton and you have no idea which skeleton it belongs to? Just throw it away.
Seriously. Get a trash bag and walk around your house while you are taking stuff down. If it is broken, it goes in the bag. Do not put it in the bin “just in case.” You will never fix it. I promise you. You are not going to get out the super glue. You are going to put it in the box, forget about it, and next year, you are going to be annoyed all over again.
Step 2: The “First Night” Box
Okay, this is the best thing I have ever done.
We all know that on October 1st, you are pumped. You want to decorate right now. But you don’t want to drag down six giant totes from the attic just to find your door wreath.
So, take one medium-sized plastic tote.
This tote is your “Instant Gratification” box.
In it, you put:
- The door wreath (and the hanger! Do not forget the hanger!).
- The doormat.
- The one or two items that go on your fireplace mantle.
- A roll of packing tape (because something is always broken).
- Scissors.
That’s it.
You label this box “FIRST – OPEN ME.”
When October hits, you bring down only this box. You can decorate your front door and your living room in ten minutes. You get the happy dopamine hit of decorating, and you don’t have to dig through the heavy boxes with all the yard stakes. Then, when you are feeling motivated, you can go get the rest of the haul.
Step 3: The Labeling Situation
Look, I used to be a “write ‘Spooky Stuff’ on the side of the box” kind of guy.
I am embarrassed to admit that.
But here is the thing—when you write “Spooky Stuff” on three different boxes, they all look the same. You are going to be playing guess-and-check next year.
This year, I went a little crazy. I got a Sharpie and I wrote:
- “Porch Decor – Pumpkins & Sign”
- “Yard – Stakes & Lights”
- “Indoor – Kitchen Mugs/Towels”
- “Costumes & Hats”
And listen, you don’t need a fancy label maker. I didn’t buy special chalkboard stickers or anything. I just wrote directly on the plastic bin with a permanent marker. If I want to change it later, I use nail polish remover to wipe it off. Simple.
Write on the side of the bin, too. Not just the lid. Because when you stack these things up in your garage or in a storage locker, you aren’t seeing the lid. You are seeing the side. Don’t make yourself lift a 40-pound bin just to read the top.
Step 4: The Lights
I hate untangling lights more than I hate paying taxes.
Here is my cheap, dirty trick. Stop buying those plastic reels they sell at the store. They are expensive and they break.
Go to your recycling bin. Find a piece of cardboard. Any box will do.
Cut a little notch on each end.
Wrap your string of lights around that piece of cardboard like you are winding up a hose. Tuck the plug into the notch so it doesn’t unravel.
I did this with all my lights this year and I almost cried tears of joy when I opened the bin and they weren’t knotted together. It takes maybe an extra 60 seconds per strand, but it saves you an hour of rage later.
Also, zip ties. Buy a bag of zip ties. They are like 5 bucks. Bundle your extension cords together. If you have a cord that you specifically use for the inflatable in the front yard, put a piece of masking tape on it that says “Front Yard.” It makes plugging everything in so much faster because you aren’t guessing which 100-foot cord goes where.
Step 5: Where do you actually keep all this junk?
This is the part I struggled with most.
My garage is a disaster zone. I have lawnmowers, kids’ bikes, tools, and old paint cans. There is literally no room for seven massive bins of plastic ghosts.
I tried the attic, but it gets so hot up there in the summer that my inflatables melted together. I tried the basement, but it got damp and my fake cobwebs got all musty and gross.
This year, I finally caved and rented a storage unit.
Now, before you roll your eyes and think I am trying to sell you something, hear me out.
It’s not just about shoving boxes into a metal room. The reason it works is because I can stack the “First Night” box right by the door. I can put all the heavy yard stuff on the bottom and the light, fragile stuff on a shelf up top.
The service I use lets me drive right up to the door. So when November hits, I can just pull up, slide the boxes in, and be done in 15 minutes. I don’t have to carry a heavy tote up a rickety attic ladder. I don’t have to trip over them in the garage.
Honestly, the peace of mind is worth the price alone. Because the worst feeling in the world is finally getting your garage cleaned out in June, only to realize you have to fill it up with pumpkins again in September. It saves my marriage, honestly.
Step 6: Don’t be a perfectionist
This is the last thing, and I think it is the most important.
You do not have to do this all in one day.
If you are tired after Halloween, just throw the stuff in the garage and deal with it next weekend. It is okay.
I spent two weeks slowly getting my stuff sorted. I did one box a day. That is way less overwhelming than trying to do it all on a Sunday night when you are already dreading work on Monday.
Final Thoughts
At the end of the day, we are just talking about plastic skeletons and orange lights. It’s not that serious.
But there is something really nice about knowing where your stuff is. There is a great feeling when October 1st rolls around, you open your “First Night” box, and you don’t have to go hunting for the scissors.
Next year, when your neighbor is out there in the dark trying to untangle their lights and cursing up a storm, you can wave at them with a cup of coffee in your hand. Because you are done. You are prepared.
And when you go to put it all away this year, just remember—take the trash out, label the boxes like you actually mean it, and if you don’t have room for it, stop cramming it into the corner of the garage. Get a storage space. You will thank yourself later. Now go enjoy the leftover candy. You earned it.









0 Comments